Integrated Approach to Fuel Management in Power Generation Companies


Executive Summary
The Power Generation companies World over operate in a complex environment of fluctuating fuel prices and revenues determined through variable tariff determination methods.
Among the various types of power plants in operation in the world viz. hydro, thermal, nuclear, renewable and geothermal – the thermal power plants constitute the largest category. Furthermore, coal as a fuel source is responsible for nearly 42% of world’s electricity generation [1]. The fuel cost is the single largest component of the cost of electricity produced in thermal power plants. In countries like India the fuel cost in such plants is more than 65% of total annual expenditure (for NTPC, the figure stands at 77% [2]) of the plants.
Fuel procurement, logistics and eventual delivery are prone to numerous uncertainties, forcing companies to pile up fuel inventory - typically around ten days of operational requirement. The capital locked up in carrying such huge inventory is substantial, around USD 1 million for a 2X 500 MW plant. This is because the loss on account of plant outage due to non-availability of fuel can be as much as USD 10 million for the same 10 day period [3].
Since the set of activities that comprise fuel management in these companies viz. planning, contracting, procurement, logistics, delivery and fuel accounting are managed in a disparate manner with multiple teams and associated systems, inefficiencies creep in. The need is to integrate the entire set of these activities from planning to accounting, with appropriate automation to ensure maintenance of the right size of fuel inventory and uninterrupted power generation. This means that the information systems and models that manage these disparate functions need to be integrated. Such integration should provide companies the complete information necessary for inventory right sizing and uninterrupted plant operation resulting ultimately in improved profitability. The paper intends to explain the issues in managing the portfolio of activities constituting fuel management and an overview of the systems used to manage these activities. The paper then proceeds to suggesting an approach to integrating the activities and how useful improvements can be brought into the fuel management process through integration of managing systems.
Business Challenge
Power generation companies, including those that operate thermal power plants, are typically not vertically integrated. They source their requirements for fuels such as coal/oil/gas from fuel companies and sign transportation and liaison agreements to ensure delivery of fuel to the power plants. The nature of the fuel sourcing business demands scouting for the right contracts by planning well in advance. This requires accurate demand forecasting abilities by the power plants. Inaccurate forecasting might result either in plant outage on account of lack of fuel or capital locked up on account of higher fuel inventories.
Although, the power plants are typically located closer to the mines/gas terminals, which need not always be the case. Most plants rely on transportation services to deliver fuel from their sources to the power plants. The transportation mode can be rail/ road/ ferry or pipelines in case of gaseous/liquid fuel. The infrastructure needed for overhaul of fuel from source to plants is vast (in terms of coaches/vessels/ carriages). Hence transportation contracts too are long term. Also, ensuring that the fuel is of the right quality requires the help of liaison and sampling agents interacting with the fuel and transportation contractors on the power company’s behalf.
Finally on the receipt of fuel at the plant, the power plant verifies the consignment against the stipulations of the fuel and transportation contracts.
Inventory management of fuel at the power stations involves accounting the fuel received, consumed and blended (at some plants only) of various categories. Precise accounting is crucial for optimal fuel burning and delivering the correct amount of power as demanded by the consumer.
In many plants around the World, the current state of automation and systems is such that the power plants have difficulty in forecasting accurate fuel requirements and placing contracts for optimum quantity of fuel well in advance. They find themselves lacking in systems that enable tracking fuel in transit and right-sizing fuel inventory at plants. A high level view of the requirements, orders, consignments in transit and inventory management indicators are rarely available in near-real time.
Disparate Systems for Fuel Management with Missing Functionalities (like Logistics Tracking)
The challenge therefore is to effectively manage the single highest contributor to the production cost, i.e. fuel, by gaining useful insight of the various processes in fuel management. Companies that are able to do this can reduce wasteful expenses and production losses and boost profitability.
The Way Forward
The high level view of the integrated fuel management solution consists of a package of modules.
1. Past Consumption.
2. Major Efficiency changes effected in the plants.
3. Meteorological Data of the plant site.
4. Expected Shutdown duration.
5. Demand side imbalance.
1. Listing major fuel suppliers along with their capacity and pricing details.
2. Distributing requirements through orders among suppliers identified for the supply period.
1. Identifying transporters in the modes of feasible transport and long-term contracts based on SLA.
2. Contracting supporting agents for liaison and sampling activities.
1. Coal yard Activities – Stacking, refueling and blending Waste Handling (for Coal powered plants).
2. Ash Sale and Disposal.

Figure 2
Traditional IT, including storage systems, aren’t poised to fulfil customer's future needs and demands. The unprecedented growth of data (almost doubling every year) has added to new challenges. The unmet needs of businesses along with increasing operating costs, have led to innovation, new architectures and new products culminating into adoption and growth of Software Defined Storage. While some of the business goals are met with SDS - lower TCO along with agility and flexibility is achieved - new challenges and issues have surfaced. Both, the large established vendors and umpteen number of start-ups, offering software defined storage in a wide variety, lead to multiple new challenges around interoperability, storage management, reporting, fragmentation leading to higher TCO, etc.
Software Defined Storage is a new paradigm and requires efforts on integration, manageability and validation of what works and what doesn't in customer data centers. This also requires a new set of tools, technologies and skill sets. This provides an unique opportunity to System Integrators (SI) who are well placed to bring all the benefits of Software Defined Storage, overcoming the challenges, using their home grown adoption methods, tools and technology expertise.
The information available will be in near real time particularly on the transit status of fuel consignments to the management. The status of fuel contracts on account of utilization, due for renewal and the SLA adherence in all contracts will be readily viewable. The status of fuel inventory available in each of the plant sites will be available in near real time including details of fuel stock in yards and the latest update on quantity of fuel consumed.
For coal-powered plants, a direct view on the quantity of fuel burnt to quantity of ash generated, and how much of the ash has been commercially utilized will be available.
The information of each of the modules will serve as inputs to the other modules, thus enabling an integrated view of the entire fuel management process in the company. Relevant KPI of each of the sub-process shall be defined to measure the performance of the company in each functional area.
Benefits:
In the absence of an integrated system for the end-to-end fuel management process, the systems landscape consists of independent systems for demand forecasting, whose result may not be available to contracting systems used for fuel procurement. Procurement systems may not contain all the supplier options available for various fuels and timelines. Consignment system monitoring is rarely integrated to other systems of monitoring. Similarly, fuel handling and inventory management systems do not have key data mapped to MIS used by senior executives.
In case of Thermal Plants, Ash Utilization can be completely independent of other systems, preventing any benchmarking and monitoring activities by the management on the ash generated and utilized beneficially.
An integrated system for fuel management would enable
Conclusion:
An integrated fuel management system is a need that is strongly felt by many thermal power companies around the world. There is a challenge in the integration of disparate real-time and transactional systems, and plant automation systems. However, a system that can successfully integrate the processes and provide a consolidated view of the complete process will provide great business value to the power generation companies.
Appendix 1: Technical Details
The schematic of the high level technical solution is shown below:
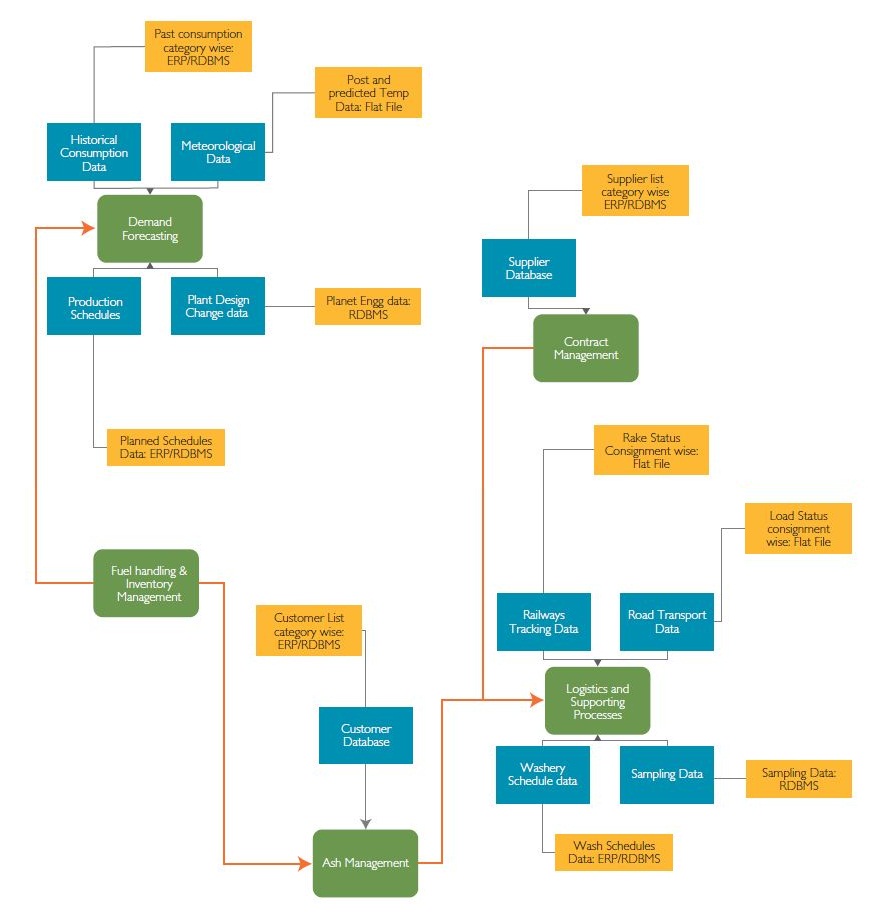
Figure 3

Figure 4
Appendix 2: References
1. World Coal Association – Coal Statistics – Sep 2011
2. NTPC –Results Year ended 31.03.2011 (Audited)
3. Black and Veatch :EMS Coal Inventory Risk Management
4. Wipro PPDS – Screenshot of Fuel Management indicators
Murty Vedula is working as a domain consultant in Wipro’s ENU-Generation & Renewable practice. He is a graduate engineer and completed his executive MBA from XLRI Jamshedpur. He has worked with power generation and IT service companies in various roles for implementing IT solutions for power companies. His interests include studying technologies enabling plant efficiency improvement and economic power production. His other interests include Smart Grid Technologies and Networks.
The Whitepaper discusses a key aspect of Power Generation, Fuel Management and the importance of having an integrated solution to better manage the cost of Power Generation. While there are good solutions for each of the sub-processes, a solution that integrates all the pieces together effectively will be adopted more quickly by the industry.
As the global energy ecosystem shifts toward decentralized renewable power generation, utilities will need to strike a shrewd balance between risk management and bold growth-oriented innovation.

Energy and Utility companies rely on their ETRM applications 24x7. With changes in the business, competitive and regulatory environments, ETRM application users have begun to demand, on average, three to six monthly enhancements.

The need for Energy Trading and Risk Management (ETRM) applications has seen immense growth throughout the IT boom. Initially these applications were very rudimentary, handling physical commodity deal capture and limited in terms of lack of mid and back ofce processing capabilities.
